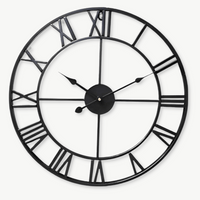


A bare wall with a cluster of frames looks polished. Add a vintage wall clock on a gallery wall, and suddenly the whole arrangement has a heartbeat. The clock becomes the anchor, the piece your eye finds first, the object that makes guests pause mid-conversation and say, "I love that."
Related reading: styling wall clocks with plants and greenery
But getting it right takes more than hammering a nail in the center and hoping for the best. The wrong placement throws off your proportions. The wrong frame pairings make your beautiful clock disappear. And spacing? A couple of inches can be the difference between "curated" and "cluttered."
Here's what actually works, broken down into steps you can follow with painter's tape, a pencil, and about an hour of your afternoon.
⭐ Key takeaways
- Your vintage clock should sit slightly off-center or at the visual "heart" of the arrangement, not dead center
- Mix frame sizes and materials, but keep one element constant (mat color, wood tone, or frame thickness)
- Leave 2 to 3 inches between each piece for breathing room
- Plan the full layout on the floor or with paper templates before touching a drill
- A clock with a diameter of 10 to 14 inches works best for most gallery walls

Why a Vintage Clock Belongs on Your Gallery Wall
A vintage clock belongs on your gallery wall because it breaks the flat, rectangular pattern of frames by introducing depth, a three-dimensional silhouette, and an implied sense of motion that keeps the whole arrangement feeling alive. Gallery walls work because they layer visual textures: photographs, prints, maybe a mirror or a small shelf. Every piece is flat, rectangular, two-dimensional. A vintage clock breaks that pattern. It introduces depth, curves, and a three-dimensional silhouette that pulls the whole composition forward.
There's also something about the ticking. Even a silent-movement clock carries an implied sense of motion. Your eye reads the hands, registers the time, and moves on to the next frame. That micro-interaction keeps the wall feeling alive rather than static.

What Counts as "Vintage" (and Why It Matters for Pairing)
Vintage can mean a brass sunburst from the 1960s, a round schoolhouse clock from the 1940s, a mid-century starburst, or even a new clock designed with retro cues like roman numerals and distressed wood. The era and material of your clock directly inform which frames, prints, and objects you pair it with. A brass sunburst clock next to a sleek black-and-white photo grid creates intentional contrast. A rustic wooden clock beside watercolor botanicals feels cohesive.
The point: identify the era and material of your clock before you pick a single frame. That one decision narrows your choices in a way that makes everything easier.
Step 1: Choose the Right Clock Size for Your Wall
Choose a clock face between 10 and 14 inches in diameter for most gallery walls: small enough not to dominate, large enough to hold its own as the visual anchor among surrounding frames. Size is where most gallery walls go wrong. Too small, and the clock gets swallowed by surrounding frames. Too large, and it dominates so aggressively that the rest of the arrangement reads as decoration around a clock rather than a gallery with a clock in it.
The Size Sweet Spot
For a gallery wall spanning roughly 4 to 6 feet wide, a clock face between 10 and 14 inches in diameter tends to hold its own without overwhelming neighbors. If your wall is larger (an 8-foot span above a sofa, for instance), you can push to 16 or even 18 inches. Anything beyond that starts to function as a standalone statement piece rather than a gallery element.
| Gallery Wall Width | Ideal Clock Diameter | Number of Surrounding Pieces |
|---|---|---|
| 3 to 4 feet | 8 to 10 inches | 4 to 6 frames |
| 4 to 6 feet | 10 to 14 inches | 6 to 10 frames |
| 6 to 9 feet | 14 to 18 inches | 8 to 14 frames |
If you're working with a clock you already own, measure it and then measure the wall space. The clock should occupy roughly the same visual weight as your largest framed piece, or slightly more. Equal weight, not double.
Step 2: Map Your Layout on the Floor First
Map your full gallery wall layout on the floor or with paper templates before touching a single nail: this one step is what separates an arrangement that looks intentional from one that looks accidental. This is the step people skip. And it's the step that separates a gallery wall that looks intentional from one that looks like things were hung wherever there happened to be a stud.
The Paper Template Method
Trace every frame and your clock onto kraft paper or newspaper. Cut out each shape. Tape them to the wall with painter's tape. Step back. Rearrange. Step back again. This takes fifteen minutes and saves you from a wall pockmarked with unnecessary nail holes.
Start by placing the clock template. It doesn't need to be at the mathematical center. In fact, slightly off-center placements (one-third from the left, or just above the midline) often feel more dynamic. Once the clock is positioned, build outward: larger frames closer to the clock, smaller frames and objects toward the edges.
The Floor Layout Method
If taping paper to the wall feels fussy, lay everything out on the floor instead. Arrange your clock and frames in the approximate shape of the wall space. Take a photo from above. Then translate the arrangement to the wall using a tape measure and a level.
Step 3: Decide on Your Gallery Wall Shape
The three shapes that work best with a vintage clock are the organic cluster, the grid with one rogue element, and the salon-style floor-to-ceiling arrangement, each gives the clock a different role and a different visual weight. Gallery walls aren't random. Even the ones that look "effortlessly eclectic" follow a hidden geometry. Here are three shapes that work particularly well when a vintage clock is involved.
The Organic Cluster
This is the most popular gallery wall style: a loose, asymmetric grouping with no strict grid. The clock sits slightly off-center, and frames of different sizes radiate outward. The key to making this look cohesive instead of chaotic is consistent spacing. Keep 2 to 3 inches between every piece, clock included. That gap is your visual thread.
The Grid with One Rogue Element
Hang your frames in a clean grid (all the same size, evenly spaced), but replace one frame with the vintage clock. This works beautifully with a round clock inside a square grid, because the circular shape reads as a deliberate interruption. It's your chance to create a moment in your home: order meets character.

The Salon Style (Floor to Ceiling)
Borrowed from 18th-century European salons, this style stacks frames from near the baseboard to above eye level. A vintage clock placed at eye level (roughly 57 inches from the floor to the clock's center) becomes the gravitational center. Taller frames go above and below; smaller ones fill the corners. This layout demands a tall wall and at least 12 to 15 pieces to avoid looking sparse.
Step 4: Mix Frames and Materials Without Creating Chaos
The safest way to mix frames around a vintage clock without chaos is to pick one unifying element, mat color, frame finish, or wood tone, and hold it constant across every single piece in the arrangement. A gallery wall with a vintage clock already has a lot going on. You've got circular vs. rectangular shapes, possibly metal vs. wood, maybe a glass face catching light. The frames you add need to complement all of that without competing.
The "One Constant" Rule
Pick one unifying element and hold it steady across every piece. Options include:
- Mat color: all white mats, regardless of frame material
- Frame finish: all black frames, but varying widths and sizes
- Wood tone: all warm-toned wood (oak, walnut, maple) in different profiles
- Glass type: all non-glare or all standard glass for consistency under lighting
If your vintage clock is brass, adding one or two brass-framed pieces nearby creates a subtle echo. If it's distressed white wood, lean into light-toned frames with natural textures. The clock sets the palette; everything else follows.
Mixing Two-Dimensional and Three-Dimensional Objects
Your clock is already three-dimensional. Leaning into that by adding one or two more 3D elements (a small floating shelf, a mounted plant holder, a decorative letter) makes the clock feel like part of a deliberate layering strategy rather than the only odd piece out. Just don't overdo it. Two to three 3D objects among mostly flat frames is the sweet spot.
💡 Did you know?
The tradition of mixing clocks into decorative wall arrangements dates back to 19th-century French apartments, where ornate clocks often served as the focal point above a fireplace mantel surrounded by framed portraits and mirrors. The gallery wall as we know it today evolved directly from those mantel groupings.
Step 5: Nail the Spacing and Alignment
Nail the spacing by leaving 2 to 2.5 inches between similar-sized frames, 2.5 to 3 inches beside the clock, and 6 to 10 inches above the furniture below, and align the clock's center to the 57-inch eye-level line. Spacing is the invisible architecture of a gallery wall. Get it right and nobody notices it. Get it wrong and the whole thing feels off, even if the individual pieces are beautiful.
Recommended Gaps
Between frames of similar size: 2 to 2.5 inches. Between a large piece (like your clock) and a smaller frame: 2.5 to 3 inches. Between the outermost frames and the edge of your furniture below (sofa, console, bed): 4 to 8 inches. The bottom of the gallery arrangement should sit 6 to 10 inches above the furniture, keeping the grouping visually connected to the piece below.
Center Line vs. Free-Form
For a grid or symmetrical layout, use a center line: a horizontal strip of painter's tape at 57 inches from the floor. Align the center of each piece (including the clock) to this line. For an organic cluster, align the visual "mass" to the center line but allow individual pieces to float above and below it. The clock itself should still land near or on this line, since it carries the most visual weight.

Step 6: Pick Art and Prints That Complement, Not Compete
Choose visually calm art, botanical illustrations, black-and-white photography, abstract line drawings, vintage maps, that supports the clock's story rather than competing with its inherent visual complexity. The art surrounding your vintage clock should support it, not fight it for attention. Think of it like a conversation: the clock is telling its story, and the frames around it are listening, nodding, adding context.
Subject Matter That Works
Botanical illustrations, black-and-white photography, abstract line drawings, typographic prints with a single word or short phrase, vintage maps, and architectural sketches all tend to coexist comfortably with a vintage clock. They're visually calm. They don't scream for attention.
What doesn't work as well: large, brightly colored abstract paintings, neon signs, or heavily patterned prints. These compete with the clock's inherent visual complexity (the hands, the numbers, the texture of an aged face).
Color Temperature Matters
If your clock has warm tones (brass, copper, aged wood, cream face), lean into warm-toned art: sepia prints, earthy watercolors, muted golds. If your clock is cooler (silver, brushed steel, white enamel), pair it with cool-toned images: blue landscapes, gray-toned photographs, pewter-framed mirrors. Mixing warm and cool deliberately can work, but it requires a confident eye and usually benefits from a neutral bridge piece (a white-matted black-and-white photo, for example) placed between the warm clock and a cool print.

Step 7: Hang Everything (the Right Way)
Always hang the clock first: it's the heaviest piece, it needs the most secure anchor, and every other frame in the arrangement orbits around its final position on the wall. You've planned. You've measured. You've arranged paper cutouts on the wall like a set designer. Now it's time to actually put things up.
Hang the Clock First
Always start with the clock. It's the heaviest piece, the one most likely to need a specific type of anchor (a wall stud, a heavy-duty drywall anchor rated for its weight), and the piece around which everything else orbits. Get it level. Step back. Confirm it's where your paper template said it should be.
Work Outward in Rings
After the clock is secure, hang the pieces immediately adjacent to it. Check spacing with a ruler after each one. Then move to the next ring outward. This prevents the common mistake of hanging peripheral pieces first and discovering that the clock no longer fits in the space you left for it.
Hardware Tips for Mixed Pieces
- Lightweight frames (under 5 lbs): picture hanging strips or small nails
- Medium frames (5 to 15 lbs): standard picture hooks into drywall
- Heavy clocks (15 lbs and up): toggle bolts or screws into a stud
- Plaster walls (common in older homes with vintage decor): use plaster-specific anchors to prevent crumbling

Room-by-Room Strategies for Vintage Clock Gallery Walls
Each room calls for a different approach: above a sofa you want presence and bold scale, in a hallway you want a single eye-level row, in a bedroom you want calm and quiet movement, and on a staircase you follow the slope. Not every room calls for the same approach. The light, the wall color, the furniture below, and even how long people spend in the room all influence the ideal arrangement.
Living Room: Above the Sofa
This is the most common spot, and for good reason. The sofa anchors the wall visually, giving your gallery a "floor." Keep the arrangement's width to about two-thirds of the sofa's length. Center the clock slightly above the midpoint of the grouping. Use a mix of 5 to 9 pieces. The vibe here can be bold: larger prints, richer colors, a statement clock.
Hallway: The Narrow Gallery
Hallways are tricky because the wall is long but narrow, and people view it from an angle as they walk by. A single horizontal row at eye level works well. Place the clock at one end (not the center) so it acts as a visual anchor that draws you down the hall. Smaller frames, consistent heights, and tight spacing (1.5 to 2 inches) keep things from looking scattered.
Bedroom: Above the Headboard
A gallery wall above the bed should feel calm, not busy. Limit yourself to 3 to 5 pieces plus the clock. Softer tones, quieter imagery (abstract shapes, landscape photography, muted florals). If you're light-sensitive, make sure the clock has a silent movement, because even the faintest tick can become maddening at 2 a.m. in a quiet room.
Staircase Wall: The Ascending Gallery
Staircase walls offer dramatic vertical space. Arrange pieces to follow the slope of the stairs, stepping up diagonally. The clock works best at eye level on the landing or at the midpoint of the staircase run, where people naturally pause. Use medium-sized frames and leave slightly more vertical space between pieces (3 to 4 inches) to account for the angle of viewing.
Unique Wall Clocks
If you haven't settled on a clock yet, this collection has over 150 options ranging from minimalist to sculptural, all built to hold their own in a gallery arrangement.
153 products
Browse the collection →Common Mistakes (and How to Avoid Them)
The most common mistakes on a vintage clock gallery wall are dead-center placement, ignoring the clock's depth, uniform frame sizes, and forgetting battery access, every one of them is easy to avoid once you know to look for it. A clock dead-center in a perfectly symmetric arrangement can look stiff, almost corporate. Shift it slightly to one side or place it above the midline. Asymmetry feels more personal, more collected-over-time, which is exactly the mood a vintage piece should create.
Centering the Clock Too Precisely
A clock dead-center in a perfectly symmetric arrangement can look stiff, almost corporate. Shift it slightly to one side or place it above the midline. Asymmetry feels more personal, more collected-over-time, which is exactly the mood a vintage piece should create.
Ignoring the Clock's Depth
Vintage clocks often protrude 2 to 4 inches from the wall. If the surrounding frames are flush, the clock casts a shadow that can look unintentional. Solve this by adding one or two other objects with depth (a small shadow box, a mounted shelf with a tiny plant) to make the varying planes feel deliberate.
Using Frames That Are All the Same Size
Uniform frames next to a round clock can make the clock look like the odd one out. Varying your frame sizes (at least three different dimensions) creates a visual rhythm where the clock's shape fits naturally instead of awkwardly.
Forgetting About Battery Access
This one sounds mundane, but it matters. If your vintage clock runs on a battery, make sure you can remove it from the wall without dismantling half the arrangement. Hang it on a single hook rather than multiple screws so you can lift it off, change the battery, and replace it in seconds.
"A room without a clock is a room that forgot what it's waiting for."
Old Italian proverb, loosely translated
Lighting Your Gallery Wall to Highlight the Clock
Good lighting makes your vintage clock the undisputed focal point: a single picture light mounted directly above it draws the eye there first, while the ambient ceiling light handles the rest of the arrangement. A gallery wall lives or dies by its lighting. Bad lighting flattens everything. Good lighting turns each piece into a small event.
Picture Lights and Spotlights
A single picture light mounted above the clock draws attention directly to it without washing out the surrounding pieces. Brass or matte black picture lights complement most vintage clock finishes. If you prefer recessed lighting, aim one spotlight at the clock and let the ambient ceiling light handle the rest of the arrangement.
Avoiding Glare on Glass Faces
Many vintage clocks have glass or acrylic faces that catch light aggressively. If you notice a harsh glare from your ceiling fixture, angle the clock face very slightly downward (a tiny shim behind the top edge works) or switch to a non-glare replacement face if available. This small adjustment makes a noticeable difference when viewing the wall from across the room.
Maintaining and Refreshing Your Gallery Wall Over Time
Keep your gallery wall fresh by swapping two or three prints seasonally while leaving the vintage clock and anchor frames in place, the clock's permanence is what holds the arrangement together as everything around it evolves. The beauty of a gallery wall is that it can evolve. Swap out two or three prints with the seasons (lighter, brighter pieces in spring; richer tones in autumn) while keeping the clock and your anchor frames permanent. This keeps the wall feeling fresh without requiring a full redesign.
Seasonal Swaps Without Moving the Clock
The beauty of a gallery wall is that it can evolve. Swap out two or three prints with the seasons (lighter, brighter pieces in spring; richer tones in autumn) while keeping the clock and your anchor frames permanent. This keeps the wall feeling fresh without requiring a full redesign.
Cleaning the Clock Face
Dust settles on horizontal surfaces, and the top rim of a wall clock collects it quietly. Once a month, lift the clock off its hook and wipe the face and edges with a soft, dry microfiber cloth. For glass faces, a tiny spritz of glass cleaner on the cloth (never directly on the clock) removes fingerprints and haze. Keep the back of the clock dry.
When to Rearrange
If you've stared at your gallery wall for over a year and nothing excites you anymore, it's time for a refresh. Move two frames to opposite positions. Introduce one new piece. Rotate a vertical print to a horizontal orientation. Small changes re-energize the whole wall without starting from zero.
Frequently asked questions about styling vintage clocks on gallery walls
Can I use a working vintage clock, or should it be decorative only?+
A working clock adds a functional layer to your gallery wall, and most people prefer one that actually tells time. Just make sure the movement is silent if the wall is in a bedroom or quiet reading nook. If the clock is purely decorative (hands removed or frozen), set them to 10:10 or 8:20 for the most visually balanced face.
How many pieces should a gallery wall have in total?+
There's no fixed number, but most well-proportioned gallery walls feature between 5 and 15 pieces (including the clock). Fewer than 5 can look sparse unless the pieces are large. More than 15 risks visual overload. The right number depends on your wall dimensions and the scale of each piece.
What if my vintage clock doesn't match any of my existing frames?+
Contrast can be a strength. A brass clock among black frames, or a rustic wooden clock amid sleek metallic ones, creates a focal point through intentional mismatch. The trick is to include one or two "bridge" pieces that echo both the clock and the frames. A frame with a warm wood insert and a black outer edge, for instance, links the two worlds.
Should I use command strips or nails for a gallery wall?+
Command strips work well for lightweight frames (under 4 lbs), and they're renter-friendly. For a vintage clock, which often weighs more, a nail or drywall anchor is safer. Mixing both methods in a single gallery wall is perfectly fine. Just check weight ratings and wall type before committing.
Can I combine a vintage clock with a modern or digital clock on the same wall?+
You can, but it's a bold choice. Two functional clocks on the same wall can create visual confusion if they're too close together. If you want both, separate them by at least 3 feet and make sure they serve different aesthetic roles: the vintage clock as the artistic focal point, and the modern clock as a discreet, readable timepiece on the periphery.